Table of Contents
Preschool vocabulary building is one of the most important components of preschool education. At this age, the children are sensitive to language. They learn new words through day-to-day interactions at home and school. But we should not totally rely on day-to-day interaction to build the child’s vocabulary. We should take advantage of the child’s sensitiveness to language to build their vocabulary. The Three-Period Lesson is the Montessori way of teaching new words. This is also called the “Three-Staged Lesson”.

Three-Period Lesson is a very effective technique. It will never fail if you pay attention to all the minute details. Dr.Maria Montessori adopted this method from one of her teachers, Eduard Seguin. If there is one thing the Montessori method is strict about, it is the Three-Period Lesson. Perfecting the Three-Period lesson is one of the most important skills for a Montessori Teacher. Keep reading this post and I will explain why.
Preschool Vocabulary Building with the Three-period Lesson
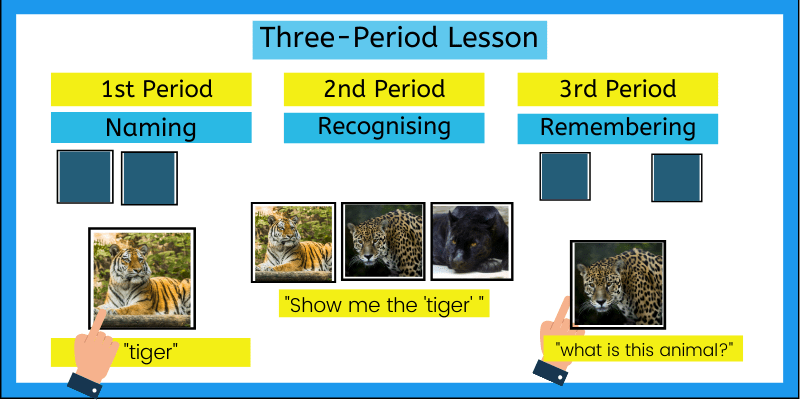
Three-Period lesson is introducing new words in 3 distinct stages. E.g., colours, shapes, sounds, numbers…etc. There are specific rules that you have to follow in each stage. Before we get into those rules, let’s be clear on some basic factors to make it more effective.
How to prepare for the Three-Period Lesson
- Before you start the lesson, clear the table and remove all the other distractions. We must ensure that the child’s attention is fully isolated from everything else but the object. E.g., If you want to introduce sounds to the child, only those Sandpaper letters should be on the table.
- Choose a time when you are less likely to get interrupted. I know it is almost “never” in a preschool setting. But you can pick a less chaotic time.
- Montessori method is child-centred and we have to “follow the child”. But when it comes to Three-period Lesson, it is a time the teacher should show her gentle authority. This is to support and guide the child to learn new words.
- Always choose 2-4 new words to teach at the same time. Try your best to have contrasting shapes, colours..etc. E.g., red, blue and yellow are contrasting colours. Blue and green are colours that look similar and might be a little confusing for the child. Square and rectangle are similar kinds of shapes. But the circle and square are contrasting shapes.
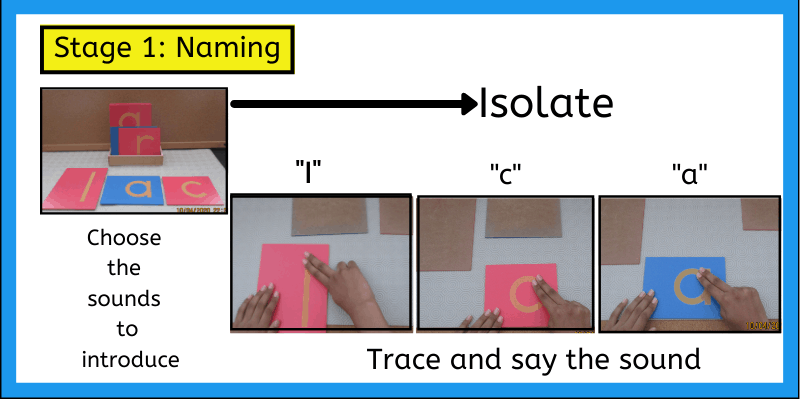
Now let’s get down to the nitty-gritty of each stage of the Three-period Lesson. I am going to use phonics sounds for this example. In the Montessori method, we use Sandpaper Letters to introduce new sounds. Choose 3 letters with contrasting shapes, a vowel and a consonant. I always choose ‘c’, ‘l’ and ‘a’ for the first lesson

How to perform the Three-Period Lesson
Stage 1: Naming
- Keep all 3 Sandpaper Letters on a tray, face down
- Pick one letter – This is called isolating. You should isolate each letter when introducing them. This way, the child’s full attention is on that particular letter and will not mix up with the other letters.
- Trace and say the sound a few times. Ask the child to do the same. Tracing the Sandpaper letter gives the child the muscle memory of the letter shape. By saying the sound while tracing the child can associate the sound of the letter with its shape.
- When you move on to the next sound, make sure the previous one goes back on the tray, face down. Each letter should be isolated at the time of introduction.
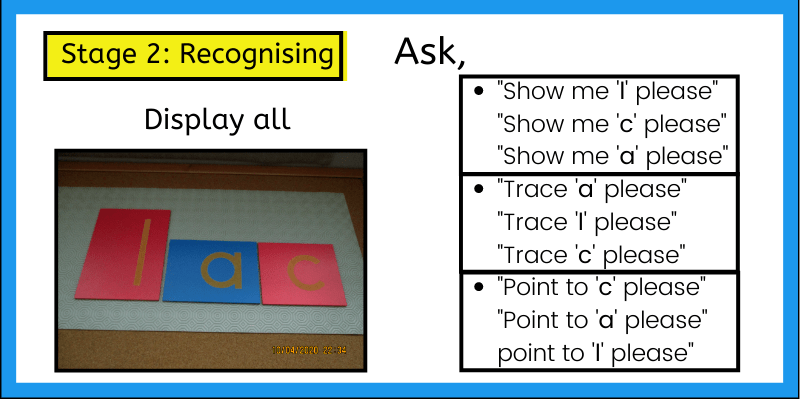
Stage 2: Recognition
- Display all three letters in front of the child.
- You should give the child simple tasks and your sentence should include the ‘new word’ in it. E.g.,
- “Show me c”, “Show me l”, “Show me a”
- “Could you trace a?”, “Could you trace l?”, “Could you trace c?”
- “Can you point to a?”, “Can you point to c?”, “Can you point to l?”
- “Could you give me l?”, “Could you give me c?”, “Could you give me a?”
- Repeat as many times as you can. Repetition of the questions means that the teacher is also repeating the sounds. This helps the child to remember the sounds with ease.
- Never point to the letter or ask “What is this sound?” It is too early for the child to remember the sound all by himself. at this stage, the teacher must say the sound and check if the child can associate the sound with the letter.
- Stage two is the most important stage. There should be a lot of repetition. Repetition means the teacher repeats the new sound many times.
- If the child is making too many mistakes, you can go back to stage one.
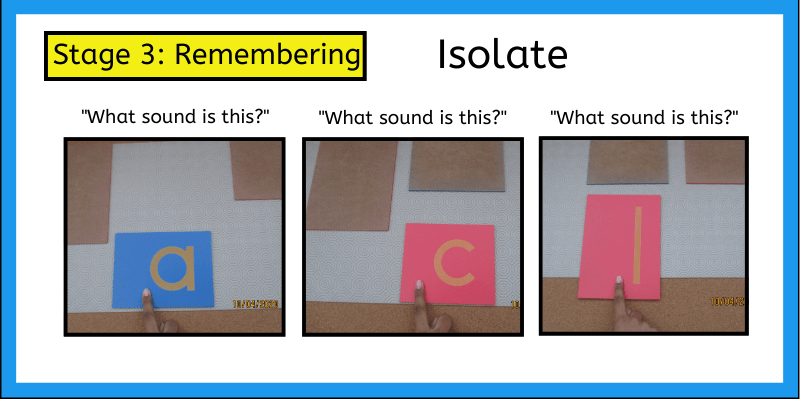
Stage 3: Remembering
- This is like a testing stage.
- Put all the letters back on the tray, face down. We have to isolate each letter like stage 1.
- Take one letter and ask, “What is this sound?”
- Test each letter. Make sure to take only one letter at a time.
- If the child cannot say the sound, go back to stage 2 and practice more.
Common mistakes when doing the Three-period lesson
The Three-period Lesson sounds simple and easy. But if we do not pay attention to the minute details, we could be making mistakes unconsciously. These little mistakes can confuse the child and might even lead to discouragement. To Perfect the Three-period lesson we need to understand each rule and practice. Let’s find out some of the most common mistakes many teachers do.
- Not “isolating” in stages 1 and 3 – It is crucial to isolate the object in these stages. Because when we specify in the 1st stage we want the child’s full attention on that particular object. If there are too many objects displayed in front of him he could get confused. The same goes for stage 3.
- Pointing to the object when giving the command in stage 2. This may seem like a no-brainer. But believe it or not, I have seen it happen unconsciously way too many times. When we ask the child to “show ‘c’ ” and point to ‘c’ at the same time, the child has no challenge there. You are doing it for the child. As a result, it will be impossible for you to check if the child is ready to move on to the next level. The child might even expect you to point every time. This mistake often happens unconsciously. How do I prevent this from happening? In the second stage, I hold my hand with my other hand. It sounds silly, but it really does help.
- Asking the wrong type of question in stage 2. This is one of the most common and biggest mistakes. If you ask “What is this sound?” in stage 2, it’s like you have skipped from stage 1 to stage 3. To answer that question, the child should remember the name. If the child does not have that repetition that he should receive in stage 2, it is too early to ask this question. In stage 2 you can only give commands/questions that include the new word. E.g., “Which one is ‘c’?” or “could you point to ‘c’? ”
- Do not ask the child to trace the letter first in the second stage. The Sandpaper letters give the child muscle memory. If the child traces and says the wrong sound, he can end up getting the wrong muscle memory. Make sure he can recognize the sound by asking him to “show” or “point to” before you ask him to trace.
Conclusion
The Three-period lesson sounds like a technique that any teacher would be using to teach new words. But what makes the Three-period lesson special is the minute details that we fail to pay attention to. Children’s attention span is short. But they do absorb everything around them really quickly. That is why ‘isolation’ is one of the most important techniques in the Montessori method. Another unique aspect of the Three-period lesson is the second period. The repetition in the second period is essential for the child to internalize the new word.
Great article! I always loved Montessori teaching. As a trilingual as well as a cooking teacher, I love and use the above method with my young students. Amazing how involved they become and easy it is to keep their attention span.
Thank you Giangi.
My son’s kindergarten teacher used this method during his virtual lessons. I had no idea it was a Montessori method. Thank you for the detailed explanation and pictures! It helps so much to see how to do things, especially when you’re not an early childhood teacher.
Thank you Misty!
This is so great! It is a way that I try and teach my son and seems to help so much!
I had never thought about using sandpaper for this type of thing before. I wonder if there’s a less abrasive object I could use that would give the same effect? My daughter has really sensitive skin.
Thank you,
Danielle!
Thank you, Sydney! yes, anything tactile would work. Gem stickers, glitter sheets, foam sheets or even velcro. check this out for more ideas. https://www.montessoripulse.com/diy-language-math/
This was a much needed blog for me. Thanks
Great post! Parents are always wondering what we can do to help our kids and prepare them for school. This is very helpful.
This is really helpful for parents and teachers who who are trying to help kids for school. Thanks
The repetition is always the part that I’ve always been slightly unsure on. It can be difficult to know when to stop for kids that are overly confident and lacking in confidence as well.
I agree Portia, but the “three-period lesson” is meant to be one on one presentation. So the teacher should always judge the amount of repetition that particular child needs.:)
This was very helpful to read. I am not too familiar with Montessori school. This perfectly explains how to do everything. I plan to try this out with my daughter when she gets to the right age.